
Can a Character Age Without Losing Their Identity? Building a Reversible Aging System in DAZ Studio
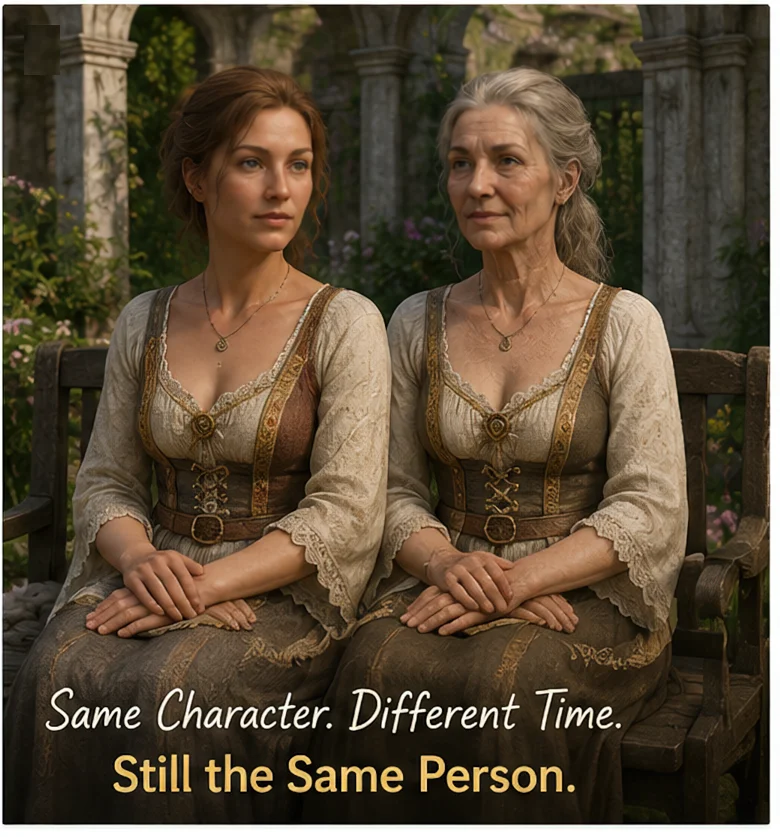
How to Create Realistic Character Aging in DAZ Studio While Preserving Facial Identity
I once pushed an aging morph to roughly 70 percent, changed the hair to gray, added a wrinkle normal map, and expected to see the same woman thirty years later. The render looked technically convincing. The cheeks were thinner, the jaw had softened, and the skin carried all the right lines.
There was only one problem. She no longer looked like the same person.
This happens surprisingly often when aging a character in DAZ Studio. The artist concentrates on obvious signs of time, while the original identity quietly vanishes underneath them. A slightly wider nose, flatter lips, altered eyelids, a shorter chin - none of these changes seems disastrous on its own. Together, they can turn a familiar Genesis figure into a stranger.
A believable aging workflow has to do something more difficult. It must let time change the character without replacing them.
IMAGE 1 PLACEMENT: Split portrait of the same Genesis-style woman as a young adult and an older character, matching camera angle and facial identity.
The Face Changed, but Was It Still Her?
Before touching any age slider, render the character from the front, side, and three-quarter view. Use a neutral expression, a medium focal length, and plain studio lighting. These reference images will not be the most exciting renders you have ever made, but they become extremely useful once the face starts drifting away from its original shape.
Look for the features that carry the identity:
- Distance between the eyes
- Shape of the upper eyelids
- Nose bridge, tip, and nostril width
- Width and natural curve of the mouth
- Chin projection
- Jaw angle
- Cheekbone position
- Small facial asymmetries
These are the landmarks worth protecting. Aging can change the tissue around them, but it should not casually rebuild the skull.
The eyes are particularly unforgiving. A figure can survive major changes to the skin, body, hairstyle, or clothing and still remain recognizable when the eye spacing and eyelid structure stay familiar. Change them too much and the connection disappears almost at once.
Artists who need a neutral base for testing can browse free DAZ and Poser characters, but the same rule applies to every figure: save the untouched shape before you begin. I usually create a Shape Preset, a basic Material Preset, and a neutral Pose Preset. It takes only a minute and saves a lot of irritation later.
Build Age Like a Rig, Not Like a Filter
A single age morph is convenient, but convenience is not the same as control.
Strong full-character morphs may alter the cheeks, jaw, lips, nose, eyelids, neck, and body at the same time. This can work for a generic background figure. It becomes risky when your character already has a distinctive face or needs to remain recognizable across a comic, animation, visual novel, or series of illustrations.
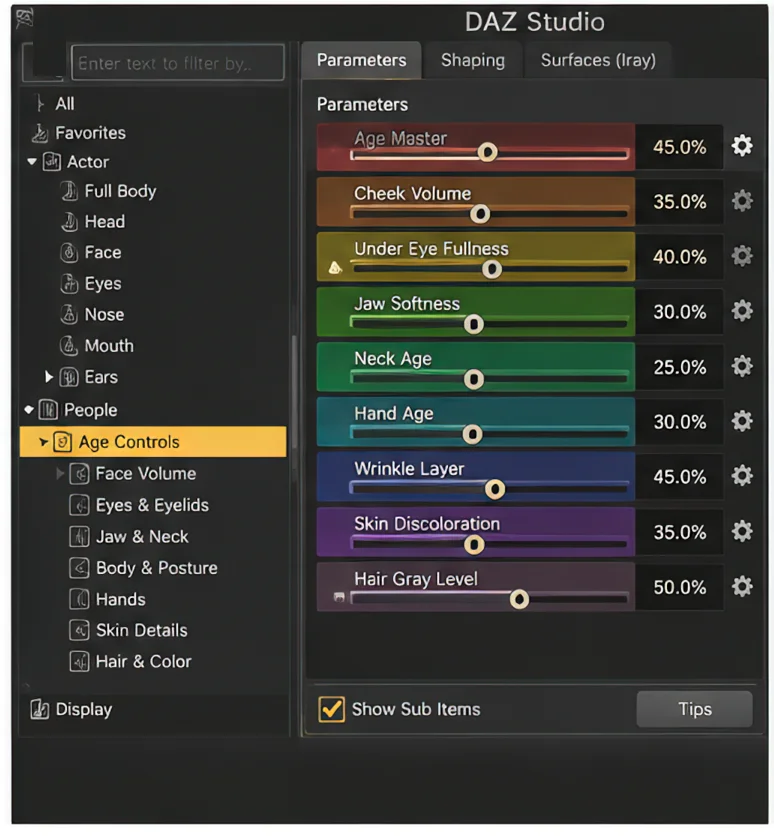
Open the Parameters pane and treat aging as a collection of smaller systems. I usually separate the controls into several groups:
- Face volume and soft tissue
- Eyes and eyelids
- Jaw, chin, and neck
- Body posture
- Hands
- Skin detail
- Hair color and density
The values rarely need to be dramatic. Many useful corrections sit somewhere between 5 and 25 percent. A small loss of cheek volume, a softer jawline, slightly heavier lower eyelids, and a subtle neck adjustment can be more convincing than one age morph pushed to its limit.
Move one slider, rotate the camera, and check the face again. The front view may seem perfect while the profile reveals a collapsed mouth or an oddly shortened chin.
The mouth is often where the illusion breaks first. Some morph combinations flatten the upper lip long before the rest of the face appears older. Others drag the corners downward until the character looks unhappy rather than aged. Teeth may also begin showing through the lips after several shapes are mixed together.
None of this looks especially alarming in the Parameters pane. It becomes obvious in a close render.
Use a Master Age Control, but Do Not Trust It Blindly
For a reusable DAZ Studio aging system, create a master property that drives the smaller morphs. Property Hierarchy and ERC Freeze can connect the individual controls and keep the setup manageable.
A master slider is useful because it lets you test different stages quickly. It also prevents dozens of aging values from being scattered across Head, Actor, People, and other property groups.
Still, do not assume that a setup which looks good at zero and 100 percent will behave correctly between those values.
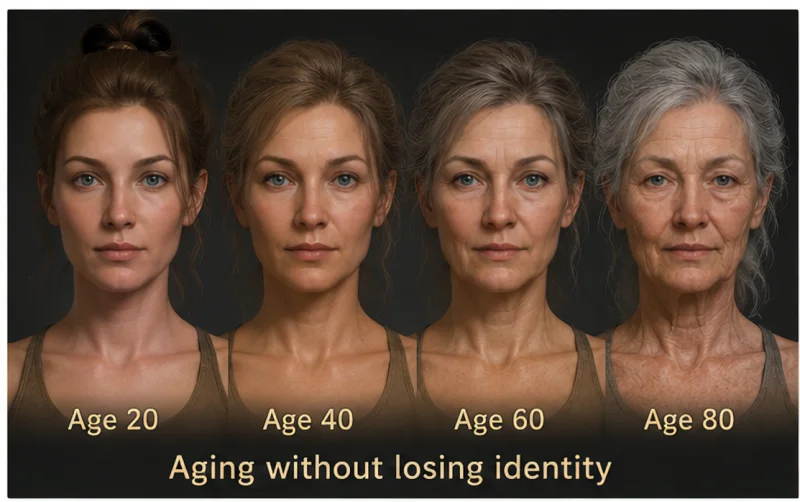
Test several intermediate positions:
- 20 percent
- 40 percent
- 60 percent
- 80 percent
This is usually where the hidden problems appear. Eyelids may swell at 40 percent. Nasolabial folds can become too sharp around 60 percent. The mouth may begin collapsing before the jaw and cheeks have changed enough to support it.
Think of the master slider as a controller, not a magic age button. It still needs supervision.
Place all linked properties inside a clearly named group such as AGE Controls. Six months later, when the figure is buried inside a large scene, you will be glad you did. Scripts, utility presets, morph tools, and other DAZ Studio resources available for free download can also help organize a more complex character workflow, although a clean naming system remains just as important as any tool.
IMAGE 2 PLACEMENT: Close view of a 3D character editor with grouped aging controls for cheeks, eyelids, jaw, neck, hands, and posture.
Skin Needs History, Not Just Wrinkles
Wrinkles are only one part of older skin.
A young skin shader combined with a powerful wrinkle normal map often looks like theatrical makeup. The face has lines, yet it still reflects light with the smooth and even response of younger skin.
In Iray, examine roughness, translucency, bump strength, normal detail, and specular response together. There is no universal roughness value for mature skin. A pale character under broad studio lights may need different settings from a darker complexion in a bright outdoor HDRI.
I normally begin with small changes. Roughness becomes less uniform. Some areas look dry, while the nose, forehead, lips, and lower eyelids continue to catch highlights. Lip color loses a little saturation. Tiny variations appear around the cheeks and temples. Veins may become more visible on the hands. Age spots should not be distributed evenly like a repeated decorative stamp.
Keep these elements on separate texture layers whenever possible. Wrinkles, veins, pigmentation, and discoloration should remain editable. A useful library of skin textures and material resources for DAZ and Poser can provide a starting point, but every map still needs to be adjusted for the character, lighting, and camera distance.
Do not judge the result only in Iray Preview. Render close crops of the eyes, mouth, neck, and hands. Preview mode can hide seams, excessive bump strength, and strange highlights that become painfully clear in the final image.
IMAGE 3 PLACEMENT: Detailed mature skin study showing subtle pores, roughness variation, light age spots, fine wrinkles, and realistic specular response.
Hair Can Add Twenty Years Too Quickly
Gray hair is powerful, sometimes too powerful.
A completely white hair preset can push a middle-aged character straight into old age even when the face still looks relatively young. Uniform gray also tends to feel synthetic unless the shader includes variation.
Mix cooler and warmer strands. Leave darker areas near the roots. Reduce saturation unevenly. Eyebrows should usually change as well, although not necessarily at the same rate as the scalp hair.
For Strand-Based Hair, inspect the groom from several angles. A slightly higher hairline, reduced density, or thinner temple areas may communicate age more naturally than turning every strand silver. Facial hair deserves the same care. A gray beard with darker eyebrows can look convincing, but only when it feels intentional.
You can experiment with hair assets for DAZ Studio and Poser to compare different silhouettes, densities, and hairline shapes. The strongest option is not always the oldest-looking one. Choose the style that still belongs to your character.
Posture Is Part of the Character
A sixty-year-old face placed on a perfectly rigid fashion pose rarely feels believable.
You do not need to bend the spine dramatically. Small adjustments are enough. Lower one shoulder slightly. Relax the fingers. Change the head position. Shift the center of gravity. Let the neck carry a little more tension.
Hands are frequently ignored, yet they reveal age quickly. Stronger-looking joints, less uniform skin color, subtle veins, and restrained nail changes can support the face without drawing attention away from it.
A collection of DAZ and Poser pose presets can be useful for establishing the base stance, but do not stop at loading a preset. Modify the shoulders, fingers, hips, and head until the pose fits this particular stage of the character's life.
Avoid making both sides perfectly identical. Real aging is uneven. One eyelid may sit lower. One smile fold may be deeper. One shoulder may rest differently.
The key word is subtle. Random asymmetry resembles a broken morph. Controlled asymmetry suggests that the character has actually lived.
Clothing Also Changes the Reading of Age
The same face can appear ten years younger or older depending on the wardrobe, fabric, fit, and silhouette. This does not mean every older character needs conservative clothing. It means the outfit should support the story rather than fight it.
A tightly fitted garment may reveal changes in posture and body volume. Softer layered clothing can shift attention toward the face and hands. Fabric roughness, small folds, wear, and restrained color choices also influence how the viewer reads the character.
When building several stages of one person, keep at least one recurring design element - a color, necklace, jacket shape, or fabric pattern. It becomes a visual thread between the younger and older versions. Suitable clothing assets for Genesis and Poser figures can be downloaded and adapted for this purpose, but continuity matters more than simply changing the outfit.
Keep the System Reversible
A reversible aging system should return cleanly to the original character. There should be no leftover wrinkle maps, altered posture, forgotten hair materials, hidden corrective morphs, or facial tension that belongs to the older version.
I keep the main components separate:
- Shape Preset for aging morphs
- Material Preset for skin changes
- Hair material or hair asset preset
- Pose Preset for posture
- Expression preset for age-specific facial tension
Do not save unrelated lights, cameras, clothing, or render settings inside these presets. The goal is modular control.
For a longer project, save milestone versions such as Age 35, Age 50, Age 65, and Age 80. They do not need to follow a perfect mathematical progression. People do not age in neat percentages. Hair may change earlier than posture. Skin may remain relatively smooth while the cheeks lose volume. One stage may require a correction that another does not.
If you create custom controls, save them properly as Support Assets rather than leaving the whole system trapped inside one scene file.
The Two-Render Identity Test
When the setup looks finished, render the young and aged versions with the same camera, focal length, expression, and lighting.
Then hide the hair and clothing in both images.
Ask yourself a blunt question: would you recognize them as the same person?
Pay attention to the eyes, nose, mouth, jaw, and silhouette. If the connection depends entirely on the hairstyle or costume, the age transformation has probably changed too much.
Now return the master age control to zero. The original Genesis character should come back without broken eyelids, altered teeth, lingering material changes, or a posture that still belongs to the older version.
Move the control forward again.
IMAGE 4 PLACEMENT: Four-stage age progression of the same digital character at approximately 30, 45, 65, and 80 years old, preserving the same facial landmarks.
The viewer should feel that years have passed. They should not feel that one DAZ Studio character preset has simply been replaced by another. That difference is small on paper, but in a portrait, comic, visual novel, or long-form animation, it is everything.
Ctrl
Enter
Noticed a misTake
Highlight text and press Ctrl+EnterRelated news:
Secrets of Photorealistic Skin Rendering in DAZ Studio and Poser: Achieving the "Lifelike Skin" Effect with Modern Shaders
Creating Motion and Emotion Animations for 3D Characters in DAZ Studio and Poser
Advanced Texturing Techniques in DAZ Studio and Poser

Creating Environments in DAZ Studio: How to Use HDRI and 3D Models to Build Atmospheric Scenes
Analyzing Trends in Creating 3D Characters for Films and Video Games
Working with 3D Scans in DAZ Studio and Poser: A Detailed Guide to Importing and Using Real-World Scans
Comments (0)