Mastering Multi-Light Setups in DAZ Studio: Professional Techniques for Rendering

In DAZ Studio, creating an immersive and photorealistic scene relies heavily on effective lighting. Using multiple light sources can transform a simple render into a dynamic composition filled with depth and character. Let’s explore professional lighting techniques that breathe life into your scenes by balancing multiple light sources, each with a distinct role.
Defining the Key Light: Setting the Mood and Direction
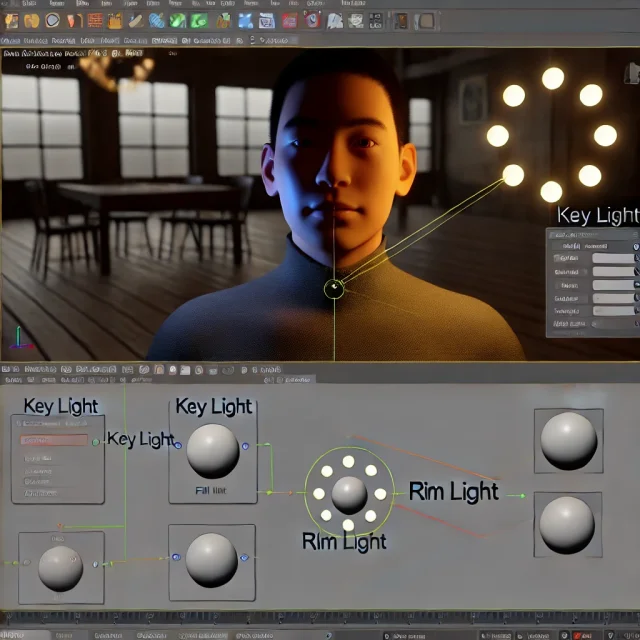
The key light is your primary source of illumination, setting the overall mood of your scene. Imagine it as the sun shining through a window or a spotlight focused on your subject; it dictates the primary shadow direction and defines contrast. In DAZ Studio, use a distant light or spotlight to create a directional key light. Key light temperature is critical; you can adjust it to add warmth or coolness to your scene. A warm key light with a slight orange tint is excellent for a sunset effect, while a cooler, blue-toned light conveys a serene, evening feel.
Fill Light: Softening Shadows and Adding Volume
To avoid harsh shadows, incorporate a fill light to balance your key light. Fill lights are generally softer and positioned opposite the key light, serving to add gentle illumination without creating new shadows. Use a spotlight with low intensity or a soft ambient light in DAZ Studio to achieve this effect. Adjust the brightness to ensure it doesn’t overpower the key light — aim for about 30-50% of the key light’s intensity. This balance softens the contrast while preserving the depth created by shadows.
Rim Light: Defining the Subject’s Outline
Rim lighting, or backlighting, adds a captivating edge around your subject, setting it apart from the background and enhancing depth. Place this light behind your character or object, directed slightly toward the camera. In DAZ Studio, use a narrow spotlight with high intensity and a small beam width to achieve a sharp outline effect. Experiment with color as well, especially when you want to add a touch of drama. A slight blue or magenta tint on the rim light can make characters look cinematic and visually striking.
Accent Lighting: Bringing Out Details
Accent lights are used to highlight specific features or focal points within your scene. For example, a focused light on a character's face, weapon, or an important object directs the viewer’s attention where you want it. In DAZ Studio, an additional spotlight with high intensity and small radius works well for accent lighting. Be mindful of the color and angle; warm accents bring out natural tones, while cooler accents provide a stark contrast.
By the way, you can download for free on our site a lot of props, weapons, equipment, environment elements to fill your scenes - see in this section.
HDRI Lighting: Crafting an Immersive Environment
HDRI (High Dynamic Range Imaging) lights are a fantastic way to add realistic ambient light and background to your scene. DAZ Studio allows you to load HDRI maps to simulate natural outdoor or indoor lighting environments. Simply go to the Render Settings, choose Environment Mode, and set it to Dome and Scene. Then, upload your HDRI map to provide comprehensive light coverage with authentic shadows and highlights. Adjusting the HDRI rotation can further enhance the lighting direction, creating more dynamic interplay between light and shadow.
You can get the finished interior and exterior surround scenes for free at this link.
Combining Light Types for a Multi-Layered Effect
Using multiple light sources of varying types is a powerful approach. Consider combining spotlights with distant lights and point lights to fill all corners of the scene with controlled lighting effects. For example, a diffuse spotlight can enhance subtle background elements, while directional lights emphasize foreground objects. Balance each light’s intensity and color to ensure no one source overpowers the rest.
- Use spotlights for accentuating key elements.
- Apply distant lights for broad environmental coverage.
- Utilize point lights to fill gaps in lighting or add subtle background highlights.
Adjusting Light Intensity and Balancing Colors
Fine-tuning light intensity is essential for achieving a balanced scene. Begin by adjusting each light separately, starting with the key light, followed by the fill and rim lights, and finally the accents. In DAZ Studio, lower each source’s intensity slightly once the setup is complete to prevent overexposure. Color balance is also crucial; maintain complementary or neutral tones to avoid clashing hues. For a more dramatic scene, try warmer tones for primary sources and cooler tones for secondary lighting.
Using Shadow Types for Realistic Depth
DAZ Studio offers various shadow types: Raytraced Shadows, Deep Shadow Maps, and Shadow Softness. Raytraced shadows are perfect for crisp, well-defined shadows, while deep shadow maps create softer, more natural transitions. The Shadow Softness slider helps blend shadows seamlessly for greater realism. For more photorealistic results, select High Quality Raytracing in the render settings, especially for scenes with intricate lighting.
Ready-to-Use Lighting Presets and Resources
If you’re eager to experiment without starting from scratch, consider using pre-made lighting presets. These are designed to save time while providing a professional lighting setup that enhances the depth and realism of your scene. You can download free lighting presets, studios, and HDRI images to create photorealistic renders in DAZ Studio and Poser, giving you a solid starting point for your projects.
Ctrl
Enter
Noticed a misTake
Highlight text and press Ctrl+EnterRelated news:
Creating and Adjusting Lighting for Atmospheric 3D Scenes in DAZ Studio and Poser
Secrets of Photorealistic Skin Rendering in DAZ Studio and Poser: Achieving the "Lifelike Skin" Effect with Modern Shaders
Creating Environments in DAZ Studio: How to Use HDRI and 3D Models to Build Atmospheric Scenes
Creating Photorealistic Portraits in DAZ Studio and Poser
Using Iray and Firefly for Rendering in DAZ Studio and Poser
Advanced Post-Processing Techniques for Renders in DAZ Studio and Poser
Comments (0)
