Basic aspects of the Daz Studio interface - #2

Hey! Did you read our first article on the Daz Studio interface? If not, you can find it here.
We have decided to continue this series. If in the last issue we discussed the basic elements of the interface, today we will look at the tools for animation.
Read on - it will be interesting!
aniMate Lite and Timeline
aniMate Lite and Timeline are the basics of the basics in Daz Studio.
aniMate Lite
aniMate Lite and Timeline are the most important tools in Daz Studio for creating high-quality animations. In fact, they are the ones you will spend most of your time with.
AniMate used to have a "2" version, but it's gone now. Only the Lite version remains, so don't be misled. It's not much different from what it was, so it's not a big deal.
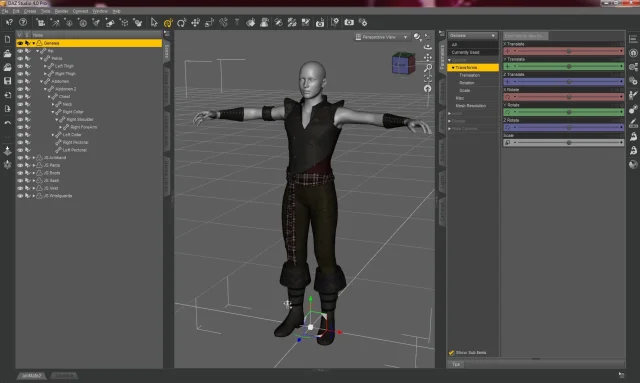
Anyway, aniMate Lite looks like this:
It starts with a window for displaying characters in scenes - and characters specifically, since aniMate is designed for them. While e.g. Timeline shows all objects and you can do whatever you want with them, with aniMate you can only add animation blocks to characters.
Next you'll probably see a timeline. Yes, it's a timeline and it has nothing to do with the timeline, because in the timeline the numbers show the frame number. But here the numbers are in seconds, which is the length of the animate block.
That's it. The main thing here is not to forget that the blocks are designed for different generations, and if the block for the 8th generation is applied to the first or third generation, you will get... So-so.
Timeline
Timeline is just awesome.
When you start it, you'll see a "Name" box on the left. This shows all the objects in the scene. Next to it you can see the scale itself, except that the numbers you see are not minutes or seconds, but frames.
Now let's take a look at what's on the panel at the bottom. Let's go through them one by one:
The first field is the maximum number of frames per project. For example, if you need to make a 10-second animation, you should put 300 frames in this field - assuming the FPS setting is 30 frames.
The second field specifies the interval of frames in the workspace. That is, if you need to work with the buttons from 15 to 60 frames, you should set the interval here.
The third field shows on which frame the slider is currently located.
FPS is the number of frames per second. That is, set the number of frames per second you want to give a hint: everyone usually sets it to 25, although you can increase it to 30. And if you have a powerful rig, you can afford 60.
The fifth column is the start and stop buttons. They are needed for convenience, so it was easier to move the slider.
The sixth is the buttons for creating and deleting keys on the Timeline. By default, each key is created every time an object moves once in the scene, and these buttons are used when you need to create an additional key.
That's how it works! Animation in Daz Studio can be really, really high quality, even if it is still quite simple. Don't forget that on our hub you can download a lot of content for your game or design projects: bundles (check link), characters, creatures, clothes (go section), hair, accessories, poses, props, environments, textures, materials, lighting (follow link) and much more.
All available for free and without registration. Add our site to your browser bookmarks so you never lose access to it.
Ctrl
Enter
Noticed a misTake
Highlight text and press Ctrl+EnterRelated news:
Analyzing Trends in Creating 3D Characters for Films and Video Games

Modern methods of creating animations for game characters
Integration of DAZ Studio and Poser with Other 3D Packages: Discussion of Import and Export Processes and Techniques

Comparing Animation Tools in DAZ Studio and Poser
Basic aspects of the Daz Studio interface - #1

Virtual Reality and 3D Characters: Exploring the Possibilities of Creating 3D Characters for VR Projects with DAZ Studio and Poser, and Necessary Adaptations for VR
Comments (0)