Basics of Sculpting in Blender
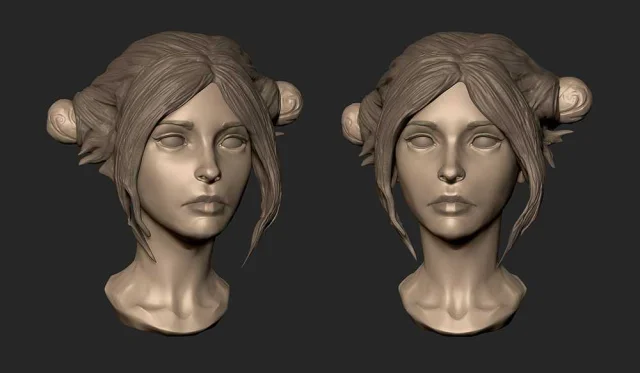
Like any function, sculpting offers different possibilities for processing characters.
Let's start with the "Symmetry" section
You can guess the purpose of the section from the title. The Mirror function is popular among users. It reflects your actions on the other axis (for example, everything that is applied to the +X axis will be repeated on the –X axis). You can enable mirroring on specific axes or on all of them at once. And also with locking - any of the X, Y and Z axes can be locked to apply the settings.
Section Remesh
Helps correct detail characteristics after the scene is finished processing. If you simply press the Remesh button, the function will be applied, but according to standard parameters (the quality may not be up to par). Therefore, before using it, we advise you to go into editing mode, click the “Pipette” icon and copy the working grid parameter. Next, we insert this information into the voxel size settings and now you can apply Remesh without reducing the image quality.
Dyntopo section
Contains the ability to change the topology level and add new geometry. When enabling the Dyntopo function, a warning appears: “Vertex data can be lost in the process.” You should NOT be afraid of this. Accept and move on. From this moment, the sculpting process will be improved and detailing will be at a new level. It would be better to add the number of polygons for orderliness. The less distance to the object, the more details have sculpting.
Working with dynamic topology parts
“Detail size” - this parameter is responsible for the number of added parts. The smaller the number parameter, the more details are available to add. But, the greater the number of objects, the slower the work processes.
Constant detail
This feature determines the level of detail at a single point, regardless of your location relative to the subject.
So, Remesh and Dyntopo are similar. But the first function is not as high quality as the second. All thanks to the high polygonal Dyntopo system. What to work with is up to you. The main thing is not to overdo it with adding polygons, otherwise your system may freeze.
One important point is that the available functions work better with Dyntopo, since they are not limited to the available vertices and create their topology. This is best seen when using the Snake Hood brush.
The choice of application is made by the user. The recommendation is useful for everyone - practice it. Sculpting is an important part of Blender and 3D modeling. Some things are easier and better done with sculpting instead of regular modeling, and some can only be done with sculpting.
Now you can easily practice sculpting for your character.
Don't forget to check out our section with ready-made characters for DAZ Studio and Poser (follow this link) - you can choose female and male 3D figures for different projects. we also have a category with creatures (go here) - there you will find a variety of animals, birds, monsters, dragons, elves, goblins, trolls and other incredible creatures! You can download all of these for free and use them in a wide variety of projects - from game creation to 3d rendering, presentations and video production.
Ctrl
Enter
Noticed a misTake
Highlight text and press Ctrl+EnterRelated news:
Integration of DAZ Studio and Poser with Other 3D Packages: Discussion of Import and Export Processes and Techniques

Visualization of hairstyles in Blender
Using Iray and Firefly for Rendering in DAZ Studio and Poser

Creating and Adjusting Lighting for Atmospheric 3D Scenes in DAZ Studio and Poser
Advanced Texturing Techniques in DAZ Studio and Poser
Analyzing Trends in Creating 3D Characters for Films and Video Games
Comments (0)
